Understanding Ballet: Lines, Balance & Technique
Ballet Posing Guide for Photographers: To photograph ballet well, you must understand the fundamentals of ballet technique. Without that foundation, even the most beautiful pose can look awkward or disjointed.
- Lines & Extensions: Ballet is all about smooth, elegant lines. The arms, legs, neck, torso should flow in graceful continuation. A photographer should look for clean extensions (fully pointed toes, extended limbs) and avoid awkward breaks in form.
- Turnout & Alignment: Many ballet positions depend on turnout (rotating the legs outward from the hips). Poor turnout or misalignment can ruin the illusion of a pose.
- Weight Distribution & Balance: Whether a dancer is in arabesque, attitude, or relevé, their weight must feel centered. The pose should look stable and deliberate, not like they’re about to fall.
- Upper Body & Epaulement: The head, shoulders, and ribcage carry subtle directional cues in ballet. The slightest tilt or twist (épaulement) gives life and emotion.
Knowing ballet’s five basic foot and arm positions (and movement vocabulary) is a big plus.
Thus, as a photographer, engaging with the dancer about what pose they’re comfortable with—and understanding how it should look—is crucial.
Pre-Shoot Planning: Concept, Wardrobe & Mood
Even before a camera comes out, careful planning can make or break the shoot.
- Define the concept or mood: Are you going for classical elegance, dramatic contrast, or abstract motion? A unified artistic vision helps guide posing, lighting, and styling.
- Inspiration & shot list: Gather reference images—Pinterest, dance photography portfolios, magazines—and prepare a shot list of key poses you want to capture. This gives structure and ensures you don’t miss essentials.
- Wardrobe & fabrics: Leotards, skirts, tutus, flowing fabrics—all can emphasize lines. But clothes must allow freedom of movement and not distract from the dancer’s form. Avoid overly busy patterns that compete visually.
- Hair, makeup, and grooming: Hair must stay controlled during movement. Makeup should be stage-friendly (stronger contrasts) so features don’t wash out under lights.
- Warm-up & body readiness: Dancers should warm up pre-shoot to reduce injury risk and make poses look natural. Cold muscles look awkward.
- Communication & consent: Discuss with the dancer which angles or body parts they prefer or want to emphasize. Ask which leg they feel more comfortable leading with.
With good pre-planning, you’ll maximize your time and positivity during the shoot.
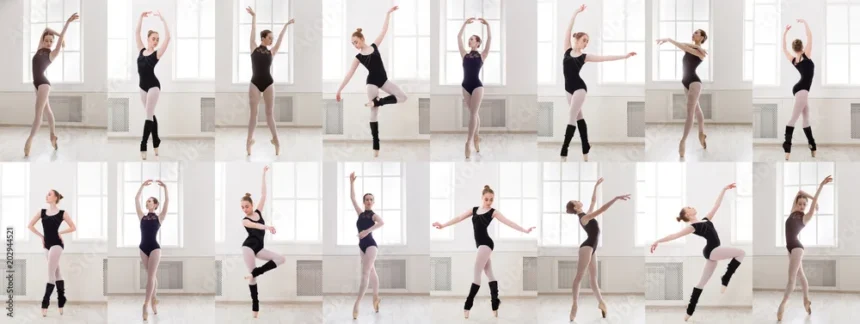
Six Fundamental Ballet Poses & How to Photograph Them
Here are six essential ballet poses every photographer should master—with tips on how to shoot them.
1. Arabesque
One leg grounded, the other extended behind, body leaning slightly forward. This is a hallmark ballet pose.
- Angle & framing: Shoot from slightly lower than eye-level to accentuate extension.
- Use negative space: Let the extended leg flow into open areas of the frame.
- Head & arm line: Ensure arms counterbalance the back leg; the head can look toward the moving foot or forward.
2. Attitude / Attitude Derrière
Similar to arabesque but the raised leg is bent (knee in bent shape behind or in front):
- Three-quarter or side angles can make the bent knee graceful.
- Watch for clean knees (no wobble, sharp bend).
- The arms should frame the pose—often one arm curved overhead, the other dropping or gracefully extended.
3. Passé / Retiré
The working leg is bent, foot placed at the supporting knee:
- Because the leg is close, tight cropping (waist up) can give elegant bust or head portraits with passing leg in view.
- Front, side, or ¾ views all work, depending on which side is stronger.
4. Tendu / Battement
A stretched leg along the floor (front, side, or back), foot pointed:
- Ideal for long lines—use wide framing to capture the length.
- Play with motion: slight movement in fabric or arms can add visual interest.
- Keep the supporting leg strong and aligned.
5. Jumps / Leaps (Grand Jeté, Sautés, Assemblé)
Frozen mid-air poses are dramatic.
- Use a fast shutter speed and burst mode to catch the apex.
- Angles from below help height illusion.
- Compose so the dancer’s center of mass is stable in the frame (avoid limbs cropping oddly).
6. Seated / Floor Poses & Splits
These poses are great to vary pace and change visual texture.
- Use top-down or low-angle viewpoints to emphasize line or symmetry.
- Foot point, leg turnout, and upper body alignment matter.
- Be mindful of how limbs overlap—pose the arms so they don’t hide legs or torso.
These six serve as a strong base. From them, you can transition into creative hybrids or flow sequences.
Lighting, Composition & Camera Settings Tips
Even the best pose needs good technical support. Here are strategies that help make ballet photos sing.
Lighting
- Soft, diffused light helps emphasize muscle tone without harsh shadows.
- Use rim / backlighting to delineate edges and separate dancer from background.
- Directional lighting (side light) can emphasize curves, lines, and shadows that offer depth.
Composition & Framing
- Use the rule of thirds, but also let limbs cross boundaries for dynamic lines.
- Pay attention to negative space so that limbs don’t “touch” frame edges awkwardly.
- Try mirroring / symmetry when capturing pairs or mirrored poses.
- Keep the background minimal or blurred to avoid distraction; ensure the dancer stands out.
Camera Settings
- Fast shutter speeds for jumps or movement (1/500s or faster if needed).
- For static poses, 1/125–1/200 may suffice, depending on your lens and lighting.
- Use continuous autofocus / tracking when shooting leaps.
- Moderate to wide aperture (e.g. f/2.8–f/5.6) to blur background but still keep enough depth of field on the dancer.
- Use burst (continuous) mode around transitions to catch ideal frames.
Mastering these helps your technical foundation match the beauty of the pose.
Working With Dancers: Direction, Rapport & Flow
A great photograph is not just what the dancer does—but how you guide and collaborate.
- Start simple: Begin with pliés, tendus, or port de bras to warm into more dramatic moves.
- Give small, clear directions: e.g. “lift your left arm a little more,” or “turn your gaze toward me.”
- Encourage flow & transitions: Ask dancers to move between poses slowly so you can capture the motion or subtle shifts.
- Watch for micro-adjustments: Shoulders, hands, toes often need tweaking to look intentional.
- Respect dancer comfort & limits: Overworking can cause injury or stiffness in later shots.
- Pause & reassess: Look at test shots and adjust posing, lighting, or framing before proceeding.
Rapport matters—if the dancer is confident, the poses will feel more natural and energized.
Post-Processing & Final Touches
After the shoot, what you do in editing can elevate or damage the final image.
- Tidy lines & edges: Remove stray hairs, frayed fabric bits, or distractions at the edges.
- Enhance contrast & clarity carefully—don’t overdo it so the dancer’s form remains soft and graceful.
- Color grading / toning: For classical shoots, clean neutral or soft pastel tones work. For moodier shoots, use contrast or monochrome.
- Crop thoughtfully: You may try alternate crops (square, vertical, panoramic) to emphasize lines differently.
- Retouching limbs: If toes or fingers stray slightly, you can sometimes nudge them subtly—but don’t over-manipulate to the point it loses authenticity.
- Maintain skin tones: Ensure editing doesn’t wash out natural tones or create unnatural casts under studio light.
Strong editing complements a great capture—it doesn’t try to fix what should have been done correctly in-camera.
Conclusion
Ballet posing for photographers is a dance in itself: you balance knowledge of technique, artistic vision, communication, lighting, and camera craft. By grounding your work in ballet fundamentals, planning your shoot, mastering core poses, guiding your dancer, and refining your editing approach, you can capture images that feel both technically precise and emotionally powerful.
If you like, I can also produce a downloadable pose cheat sheet, a video tutorial playlist, or a pose progression plan (beginner → advanced) tailored for ballet photographers.